Set up Lead Time | How To
Available to Existing Inventory Management Subscribers
This feature is only available to existing Inventory Management subscribers. Non-Inventory Management subscribers can learn more about using the ShippingEasy Product Catalog.
We are not currently opening Inventory Management to new users or developing new features or functionality for our Inventory solution. This means that at this time we cannot address the issues you have with the current system.
If you need an inventory solution that lets you add your third-party fulfillment provider to your account, our sister company ShipStation may be a better solution for you.
ShippingEasy’s Inventory Management solution gives you the tools you need to manage and track your inventory including stock replenishment. Lead Time is an important factor when it comes to determining how much stock to purchase when you reorder.
Lead Time is the number of days between when your supplier receives your purchase order and the inventory is delivered to you. Typically, it’s critical to factor in your expected sales during the lead time when creating a PO to ensure you have enough stock to fulfill all orders before you reorder inventory again.
Lead Time will be applied in one of two ways:
-
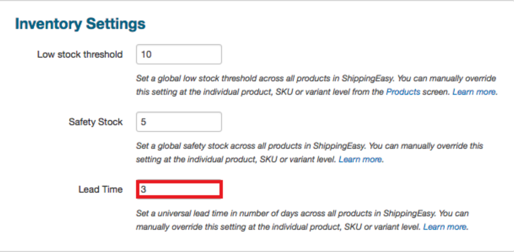
Universal Lead Time: If you set a Lead Time on the Inventory Settings page and there is not a Lead Time set on individual products, this Lead Time will be applied to all products.
-
Individual Lead Time: If you have set a Lead Time on an individual product page, this value will override the Universal Lead Time set.
Universal Lead Time is applied to all self-managed inventory saved to your PRODUCTS catalog.


-
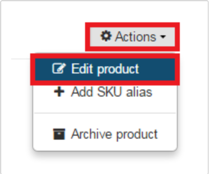
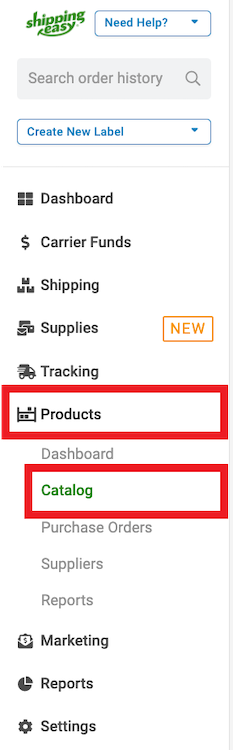
On the product details page, expand the Actions menu and select Edit product.
-
In the Lead Time field, enter the number of days it takes to receive the inventory for this product.


-
Prepare a CSV file for your Products, with a column dedicated to "Lead Time". Learn more about which fields can be included in a CSV upload of Products. Within this column, note the Safety Stock value for each of your Product SKUs stored in your warehouse.
-
Upload the CSV file of Products to ShippingEasy. Learn how to upload a CSV file of Product SKUs.
Comments
Add a Comment
Please sign in to leave a comment.
Tags:- answerbot_article_public
-